GoCD Developer Documentation
This documentation should allow you to setup your development environment to work on the codebase for GoCD, a free and open-source Continuous Delivery server.
Setting up your development environment
Step 1: Get the code and run a local build
GoCD requires the following software packages to do a basic build without running all the unit/functional/integration tests.
- Git
- Java JDK 25+
- NodeJS >= 24 with corepack enabled
For Mac Users
To avoid interfering with other projects, the recommended way to install prerequisite dependencies is by combining:
- Homebrew - for git/basic tools where latest versions are fine
- Mise - for GoCD specific build/test tooling
Recommended combined setup (assuming mise is activated on your shell):
brew install git
git clone https://www.github.com/gocd/gocd
cd gocd
mise install --yes # Installs recommended tools from https://github.com/gocd/gocd/blob/master/mise.toml
Minimal Homebrew-only setup:
brew install git temurin25 node@24
corepack enable
git clone https://www.github.com/gocd/gocd
For Windows Users
The recommended way to get the prerequisite packages is by combining:
- Scoop - for git/basic tools where latest versions are fine
- Mise - for GoCD specific build/test tooling.
Recommended combined setup (assuming scoop is already activated):
scoop install git msys2
msys2 # Unfortunately needed at dev time due to changes made by google-protobuf's ruby implementation
ridk install 2 3
scoop bucket add extras
scoop install mise extras/vcredist2022
git clone https://www.github.com/gocd/gocd
cd gocd
mise install --yes # Installs recommended tools from https://github.com/gocd/gocd/blob/master/mise.toml
Validate that you can build
Validate the basics to bootstrap a local dev environment first. It may take a few minutes to run the first time, so maybe go grab a coffee
./gradlew clean prepare
Validate you can build installers:
./gradlew clean agentGenericZip serverGenericZip
After a successful build, the ZIP installers for GoCD Server and GoCD Agent are outputted to installers/target/distributions/zip/
$ ls installers/target/distributions/zip/
go-agent-16.7.0-3795.zip  go-server-16.7.0-3795.zip
If all went well, you should be in good shape to set up your IDE.
Step 2: Setup IntelliJ
The core team use IntelliJ IDEA as the IDE for GoCD development (at least for Java code and related derivatives). If you use another IDE, it will be up to you to figure out a working configuration based off of these instructions. Either the Community Edition or the paid Ultimate edition will work.
For TypeScript, JavaScript, Sass, Ruby, and other parts, some of us use other editors, such as Visual Studio Code, Sublime Text, Vim, Emacs, etc. That is completely optional.
Re-run the prepare from the steps above:
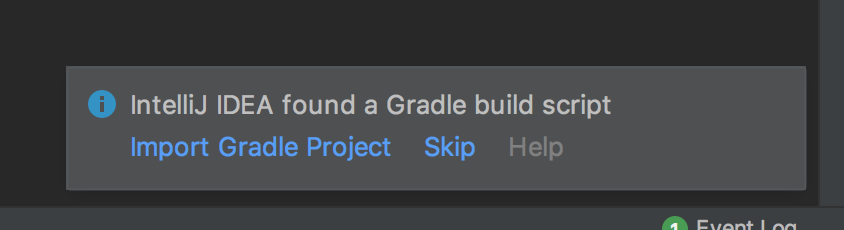
./gradlew prepareAfter the preparation phase has succeeded, open the project in IDEA by opening the
build.gradlefile in the top level of the working directory and choosing to "Open as Project".At this point, IntelliJ IDEA is probably prompting you if you want to import the project using gradle. Click Import Gradle Project.
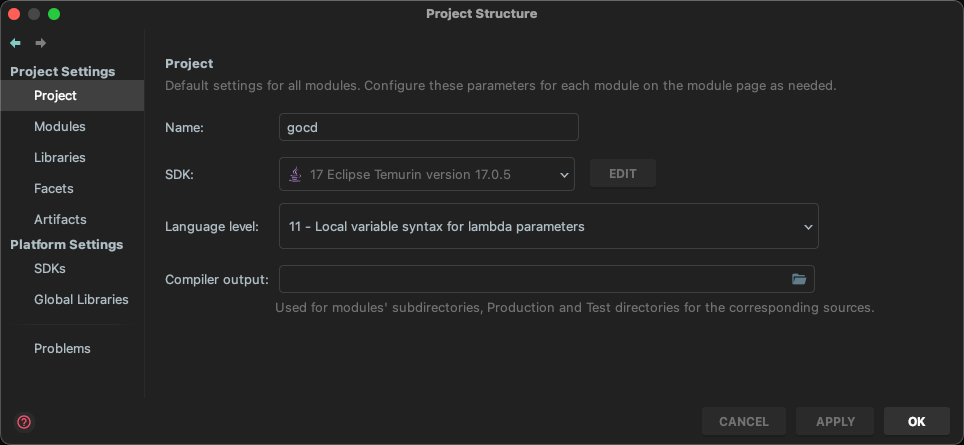
Open project settings.
- Select a Java 25 JDK. While other JDKs might work, GoCD now ships with LTS versions only so you will be safest with that. There is an IntelliJ
miseplugin which can auto-select this for you, if you are both using mise, and install this plugin. Change the project language level to Java 21.
OPTIONAL for IDEA Ultimate Edition: Setup a JRuby SDK (use
$GOCD_HOME/server/scripts/jruby) as the JRuby binary (Ruby support is only available to Ultimate Edition users)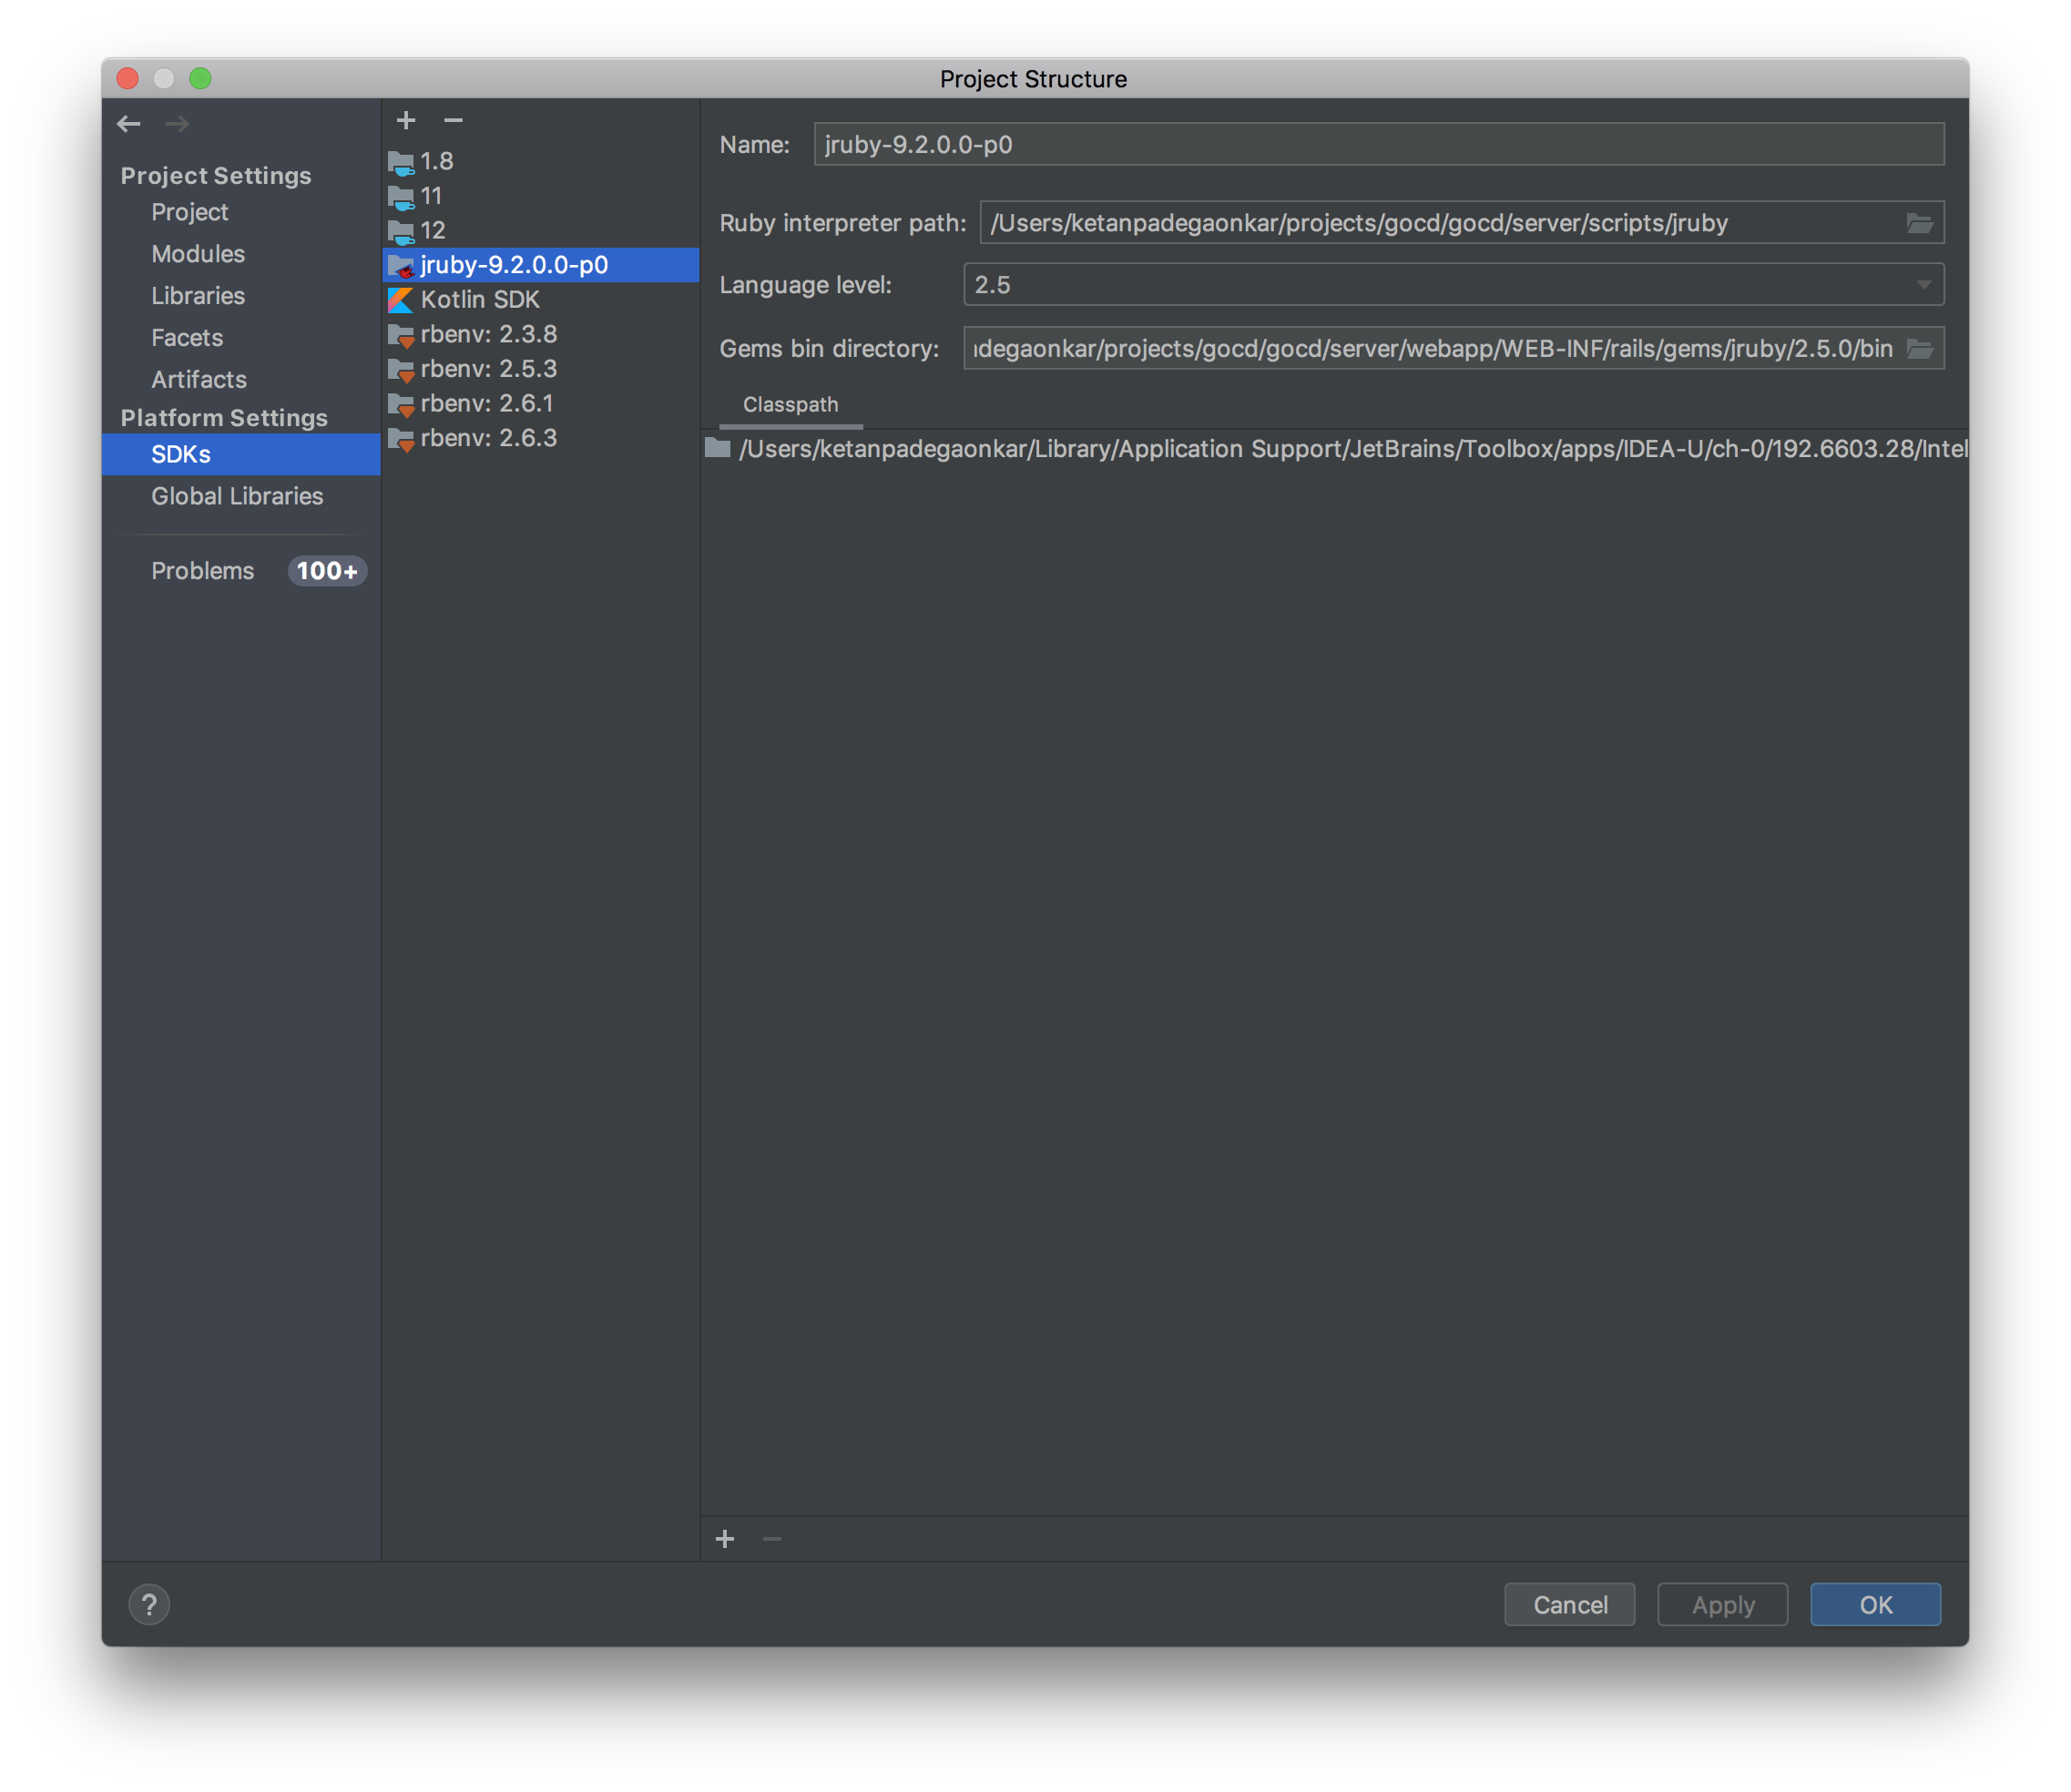
- Select a Java 25 JDK. While other JDKs might work, GoCD now ships with LTS versions only so you will be safest with that. There is an IntelliJ
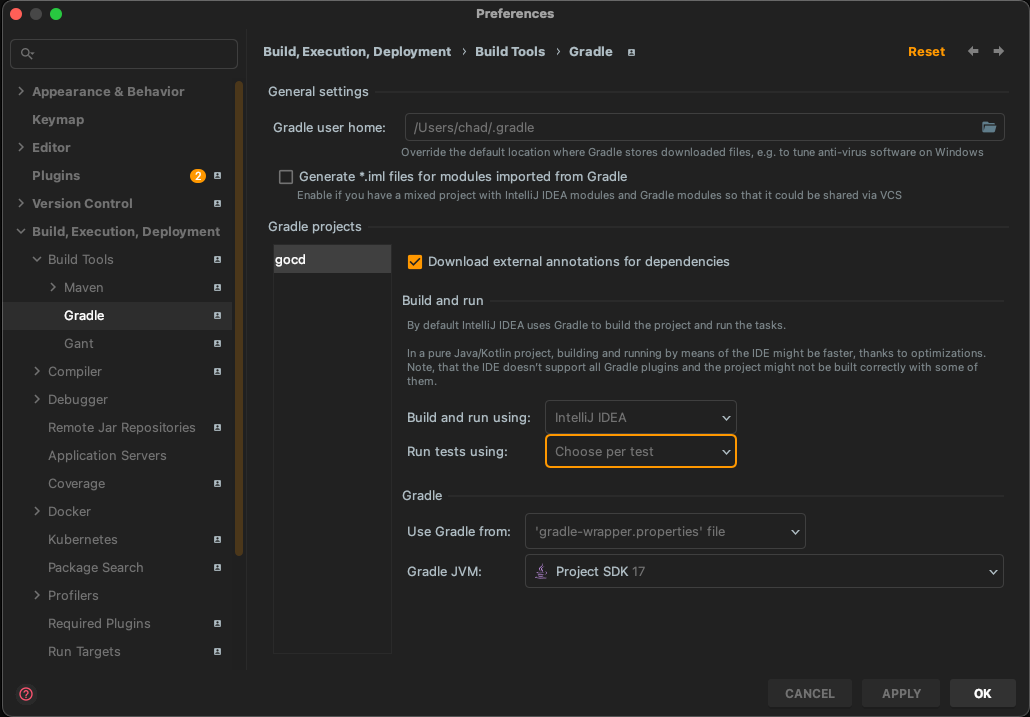
Open Gradle Settings
Use the same JDK that you are using with the project.
Install the Lombok IntelliJ plugin
Find
Lombokin the plugin settings and install it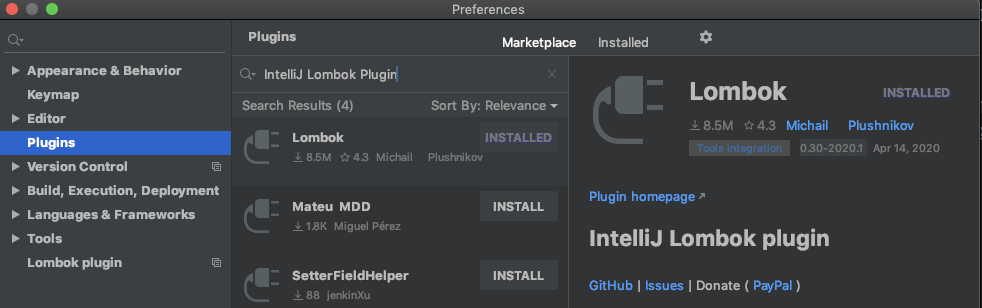
More info here https://projectlombok.org/setup/intellij
- Restart IntelliJ IDEA after installing Lombok
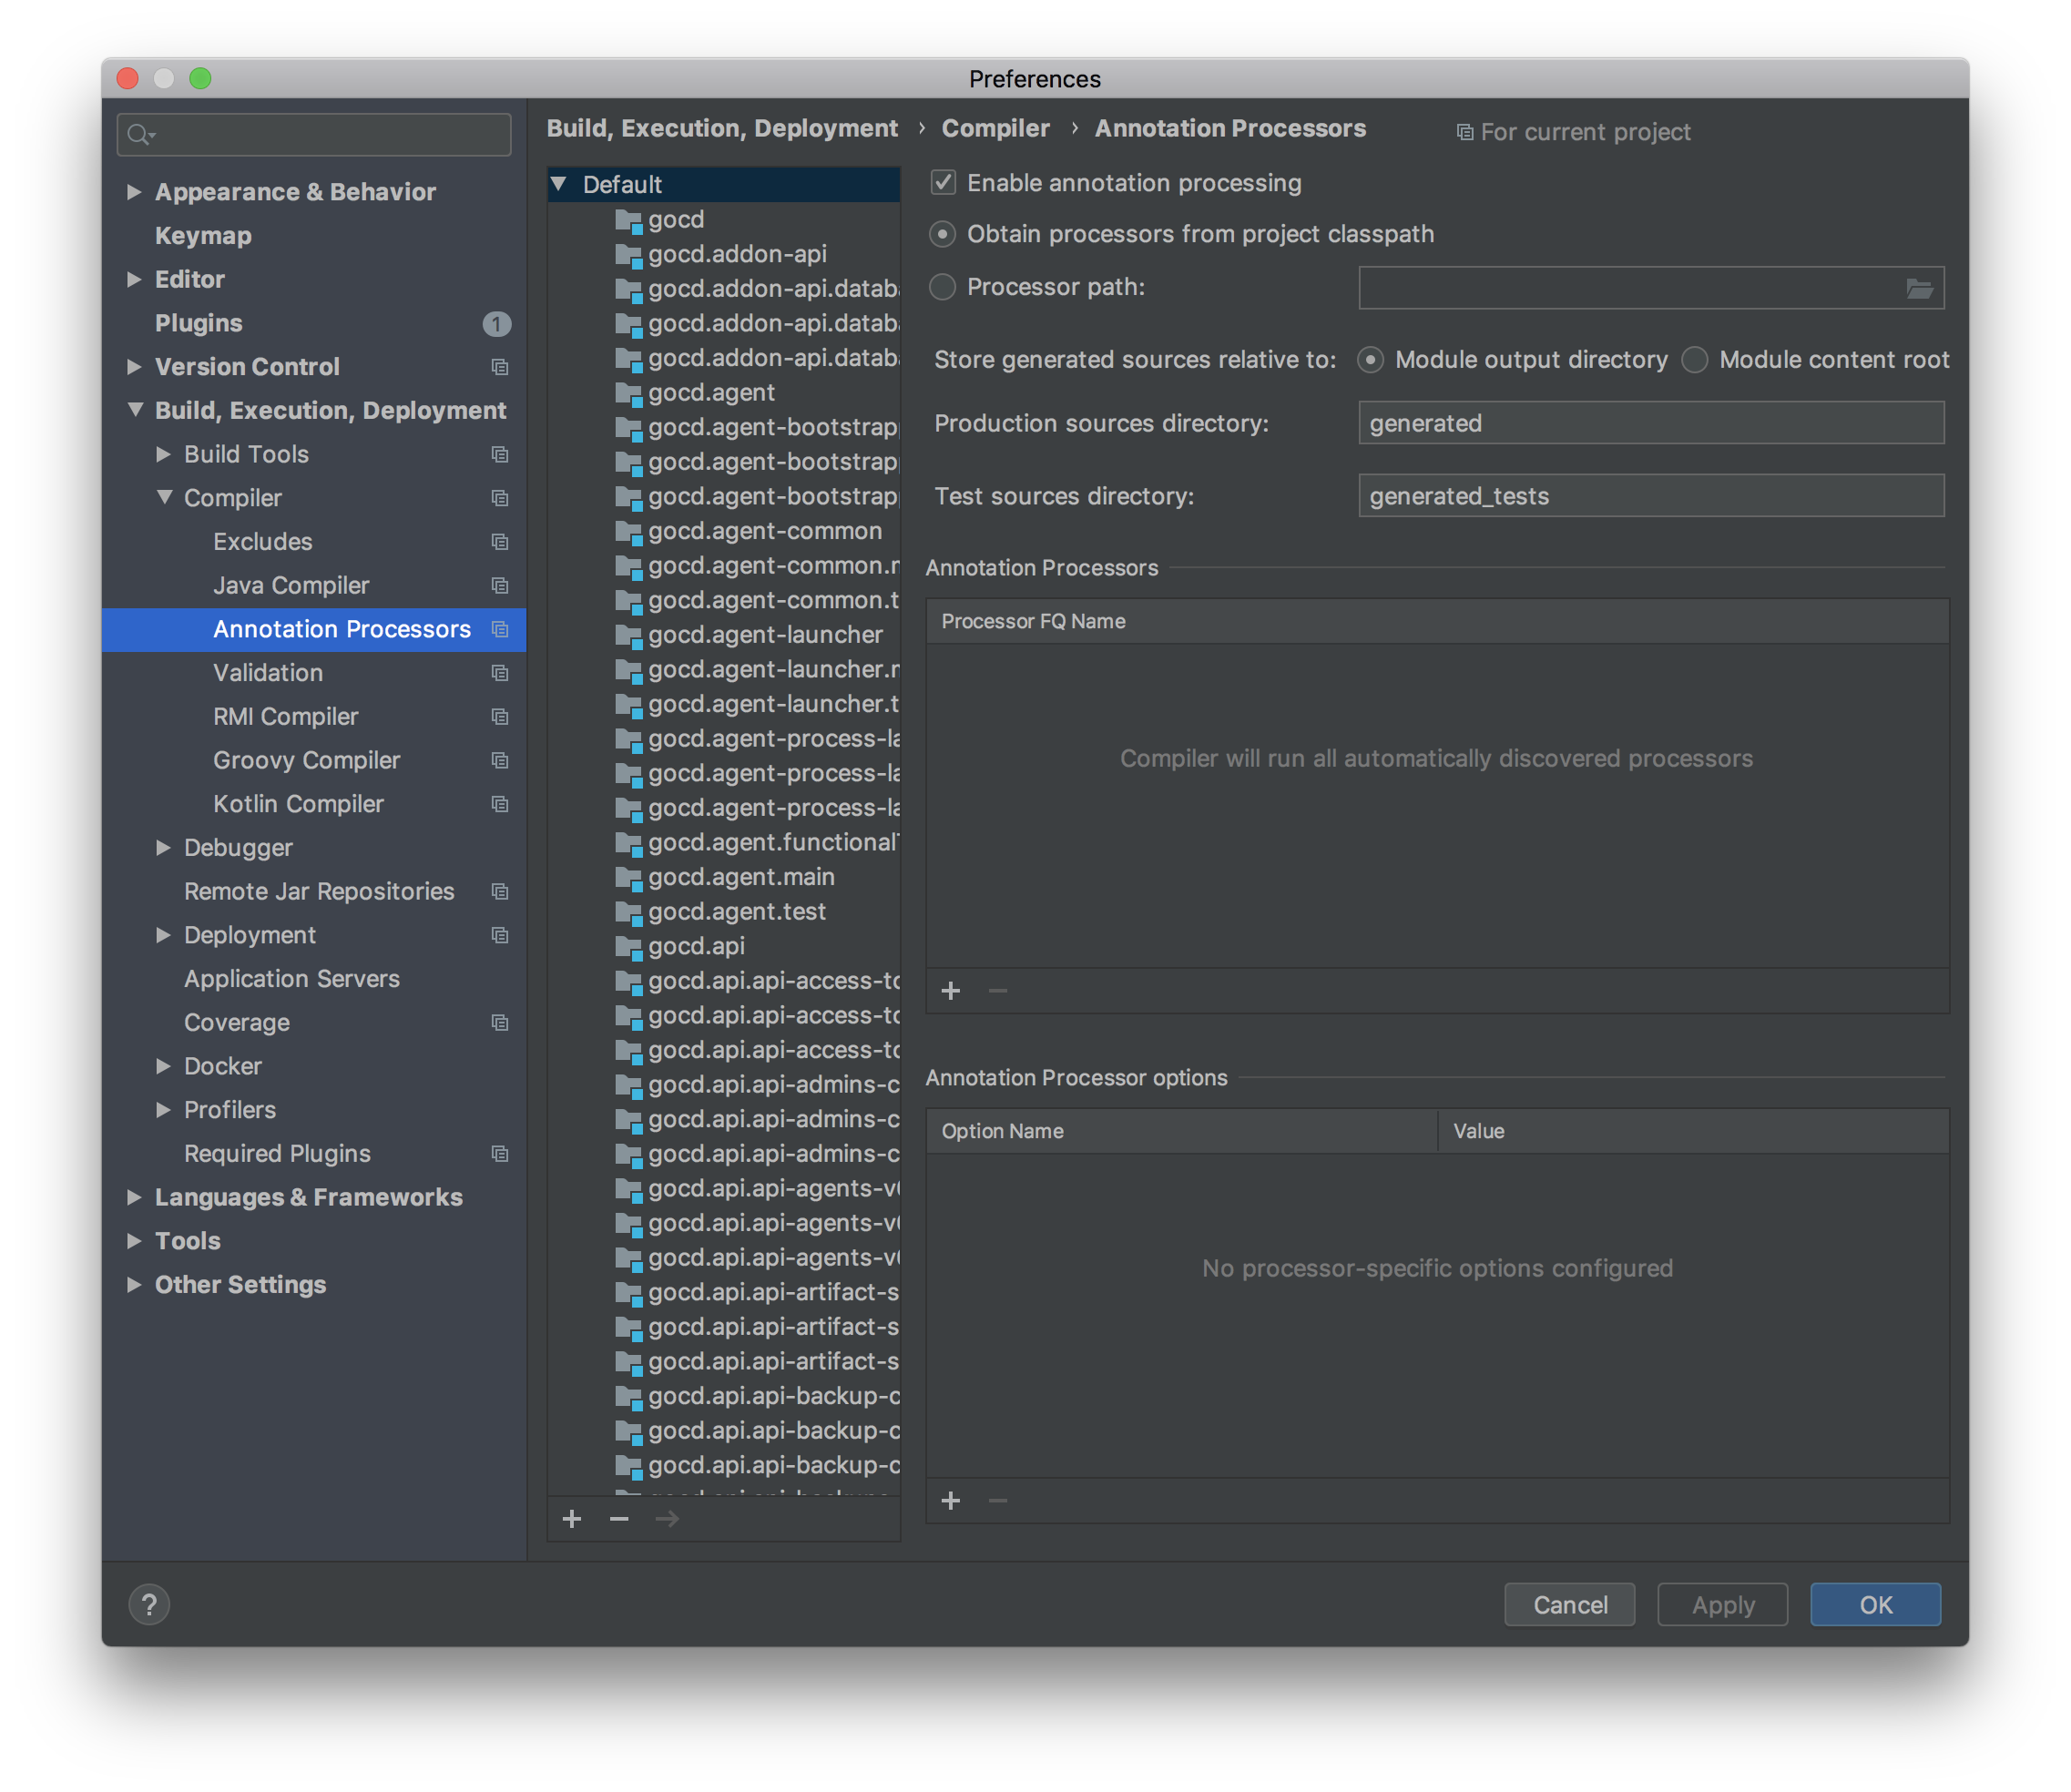
Configure annotation processing
- The Lombok plugin will prompt you to setup an annotation processor
- Enable annotation processing, setting IDEA to obtain processors from the project classpath (the default setting)
2.1: Running the Development Server via IntelliJ IDEA
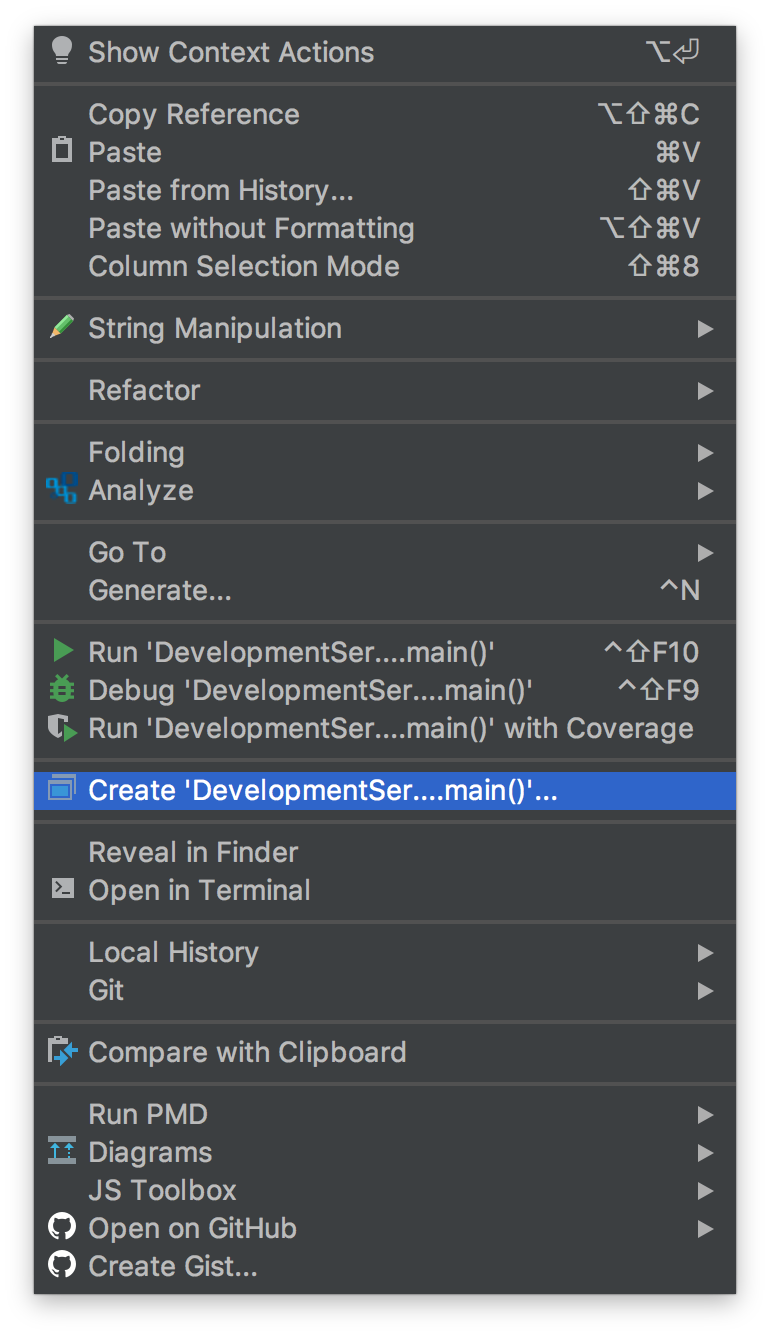
- Open the class
DevelopmentServer Right click and select Create 'DevelopmentServer.main()'
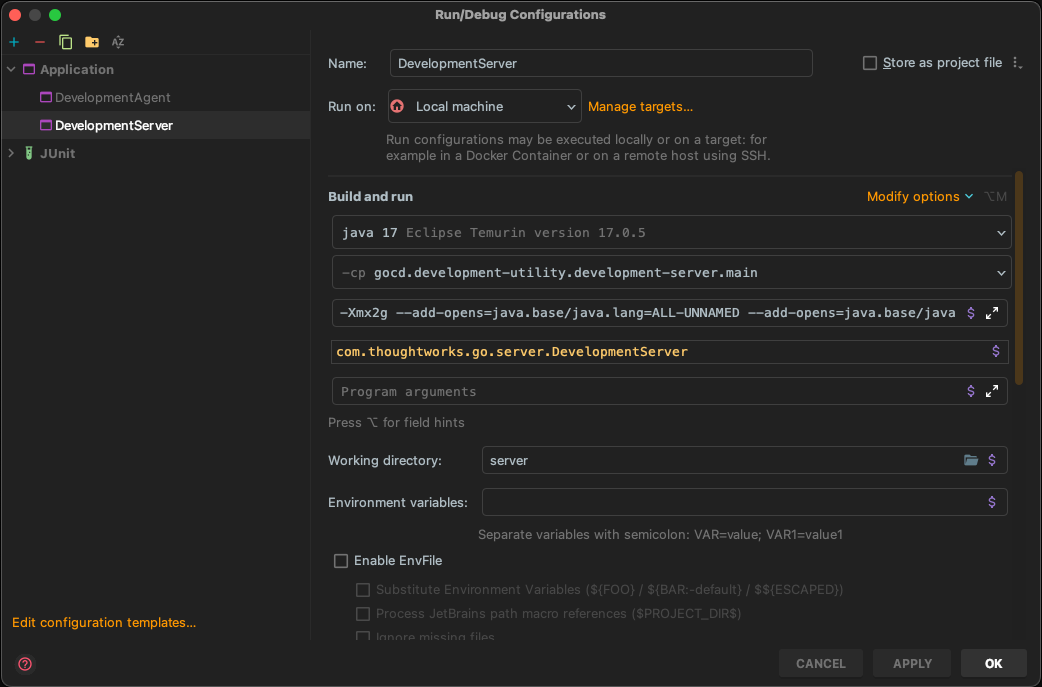
Configure the DevelopmentServer JVM args
VM Options:
 -Xmx2g
 --add-opens=java.base/java.lang=ALL-UNNAMED
 --add-opens=java.base/java.util=ALL-UNNAMED
 --add-opens=java.base/sun.nio.ch=ALL-UNNAMED
 --add-opens=java.base/java.io=ALL-UNNAMED
 --enable-native-access=ALL-UNNAMED
 --sun-misc-unsafe-memory-access=allow
 -XX:+IgnoreUnrecognizedVMOptions
For Java 16+ compatibility. GoCD server requires certain JDK packages to have internals opened for access due to the way it was originally designed. There are also some additional
--add-opensrequired when in debugging mode for use with Rails andsass-embeddedcompared to production mode. If something isn't working, you can check the most up-to-date list of required opens by referring to theJvmInternalAccessArgswithin the server Gradle config here and the latestmasterversion of the Gradle Jruby configuration here- Working dir:
server Select the same JDK you are using for Gradle, and as the project SDK
2.2: Running Development Agent via IntelliJ IDEA
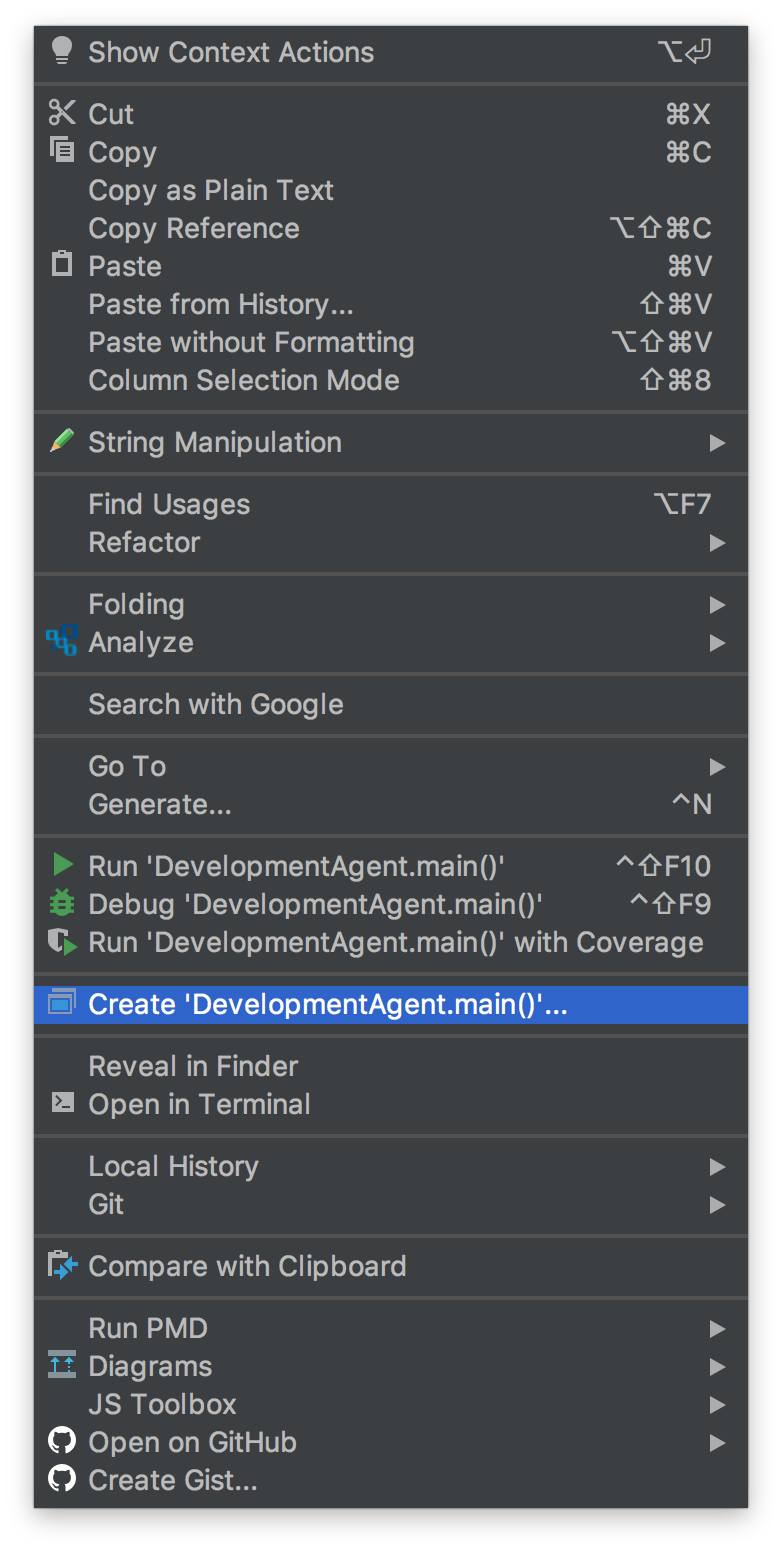
- Open the class
DevelopmentAgent Right click and select Create 'DevelopmentAgent.main()'
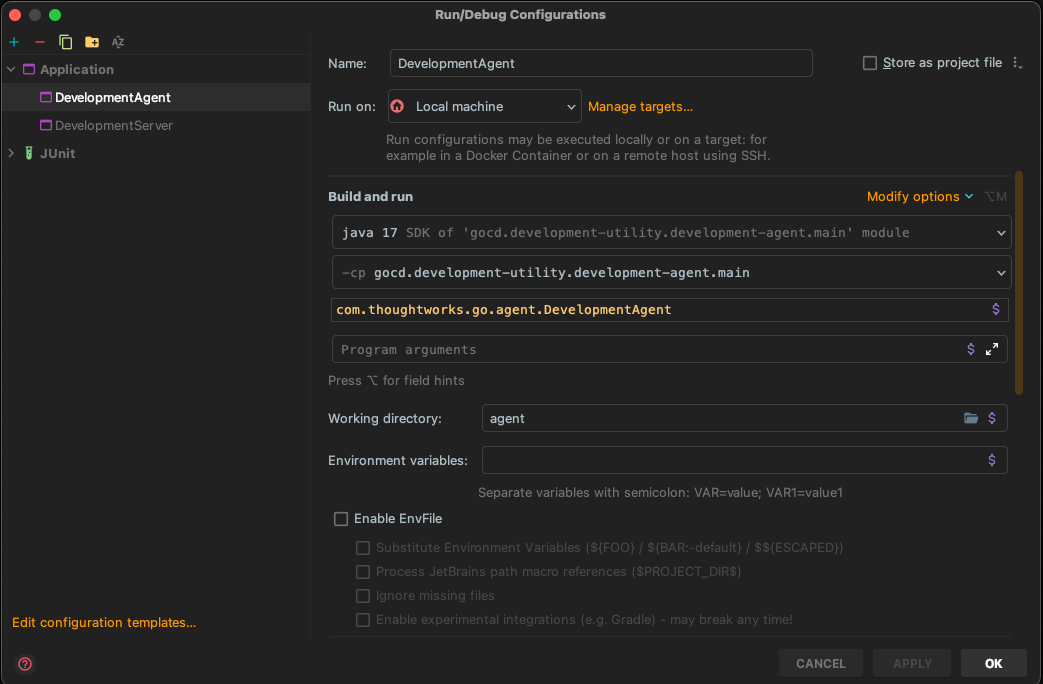
Configure the DevelopmentAgent JVM args
VM Options:
 --enable-native-access=ALL-UNNAMED
 --sun-misc-unsafe-memory-access=allow
 -XX:+IgnoreUnrecognizedVMOptions
If something isn't working, you can check the most up-to-date list of required opens by referring to the
JvmInternalAccessArgswithin the agent Gradle config here and the latestmasterversion of the Gradle configuration Gradle Jruby configuration here- Working dir:
server - Select the same JDK you are using for Gradle, and as the project SDK
2.3: Configure a default JUnit template for running tests via IntelliJ IDEA
- For Java 16+ compatibility, GoCD server requires certain JDK packages to have internals opened for access as mentioned above. The Gradle configurations will do this automatically when running tests against the server, however if you choose to run test tests using IntelliJ IDEA itself, you will find tests failing with access errors. To make each JUnit configuration start with the required access you can edit the default template:
- Open
Run -> Edit configurations... - Click
Edit Configuration Templates...and find theJUnitdefault configuration - In the VM Options box that should start containing
-ea, add the same options as for theDevelopmentServerabove, to allow the GoCD server to access certain required JVM internals while running tests. - After this, each JUnit run configuration that is manually or dynamically created should have the necessary configuration to work without issue.
Step 3: Running tests
3.1: Additional pre-requisites for Java/Server tests
Manual setup
Running some of the Java tests requires some additional dependencies, mainly for SCM tools used to validate integrations of materials and some tool-specific task runners. If you are not worried about running ALL tests or tests in these areas, you can skip this and install pieces when necessary.
SCM tests
- Subversion
- Mercurial
- Perforce Helix Core Server (
2025.2specific version required) & Perforce Client (2022.1+will likely work, version doesn't have to match)
Task-specific tests:
- Apache Ant (already installed if you use mise)
- Rake/Ruby (pre-installed on MacOS)
- NAnt (Windows-only)
Browser JS tests:
- chromedriver (Chrome, Windows default) or geckodriver (Firefox, non-Windows default)
For Mac Users
Homebrew is the easiest way to install the additional packages:
brew install subversion mercurial perforce
Non-SCM tools are managed via mise so you should have them installed already if you followed the recommended minimal approach.
For Windows Users
The easiest way to get the additional packages is by using Scoop
scoop install mercurial sliksvn chromedriver
Unfortunately perforce and nant do not have mise or scoop packages at time of writing. If you need to
run these tests we recommend you consult https://github.com/gocd-contrib/gocd-oss-cookbooks/blob/de0203ae46868ed95dabf713916b5755e604d805/provision-windows/provision-windows.ps1#L62-L72 for setting these up in a scriptable way.
Alternatively, for Perforce you can use a full installer for both client and server. It will create a service and ask you for a repository root folder. I'd suggest putting it somewhere you don't care about and
then disabling the service. GoCD's tests don't need p4d to be running or rely on this root folder - they only need
the binary to be available on the PATH which the installer does for you.
3.2: Running Java/Server tests from the command line
As GoCD is a multi-project Gradle setup, there are many combinations you can run. However some common ones are:
./gradlew allTests # All the quicker tests across projects. Excludes server integration tests.
./gradlew server:fastUnitTest # Only the quicker unit tests for the server
./gradlew server:integrationTest # The server slow integration tests
./gradlew common:test --tests P4MaterialTest # Example filtering for a specific test
3.3: Running JRuby/Rails RSpec tests from the command line
Here are some RSpec specific commands you may find useful —
./gradlew rspec # run all specs, with default arguments
./gradlew rspec -Popts='--pattern spec/controllers/**/*_spec.rb' # to run controller specs
./gradlew rspec -Popts='--pattern spec/foo/bar_spec.rb' # to run a single spec
3.3b: [OPTIONAL for Ultimate Edition] Running JRuby/Rails RSpec tests from IntelliJ IDEA Ultimate Edition
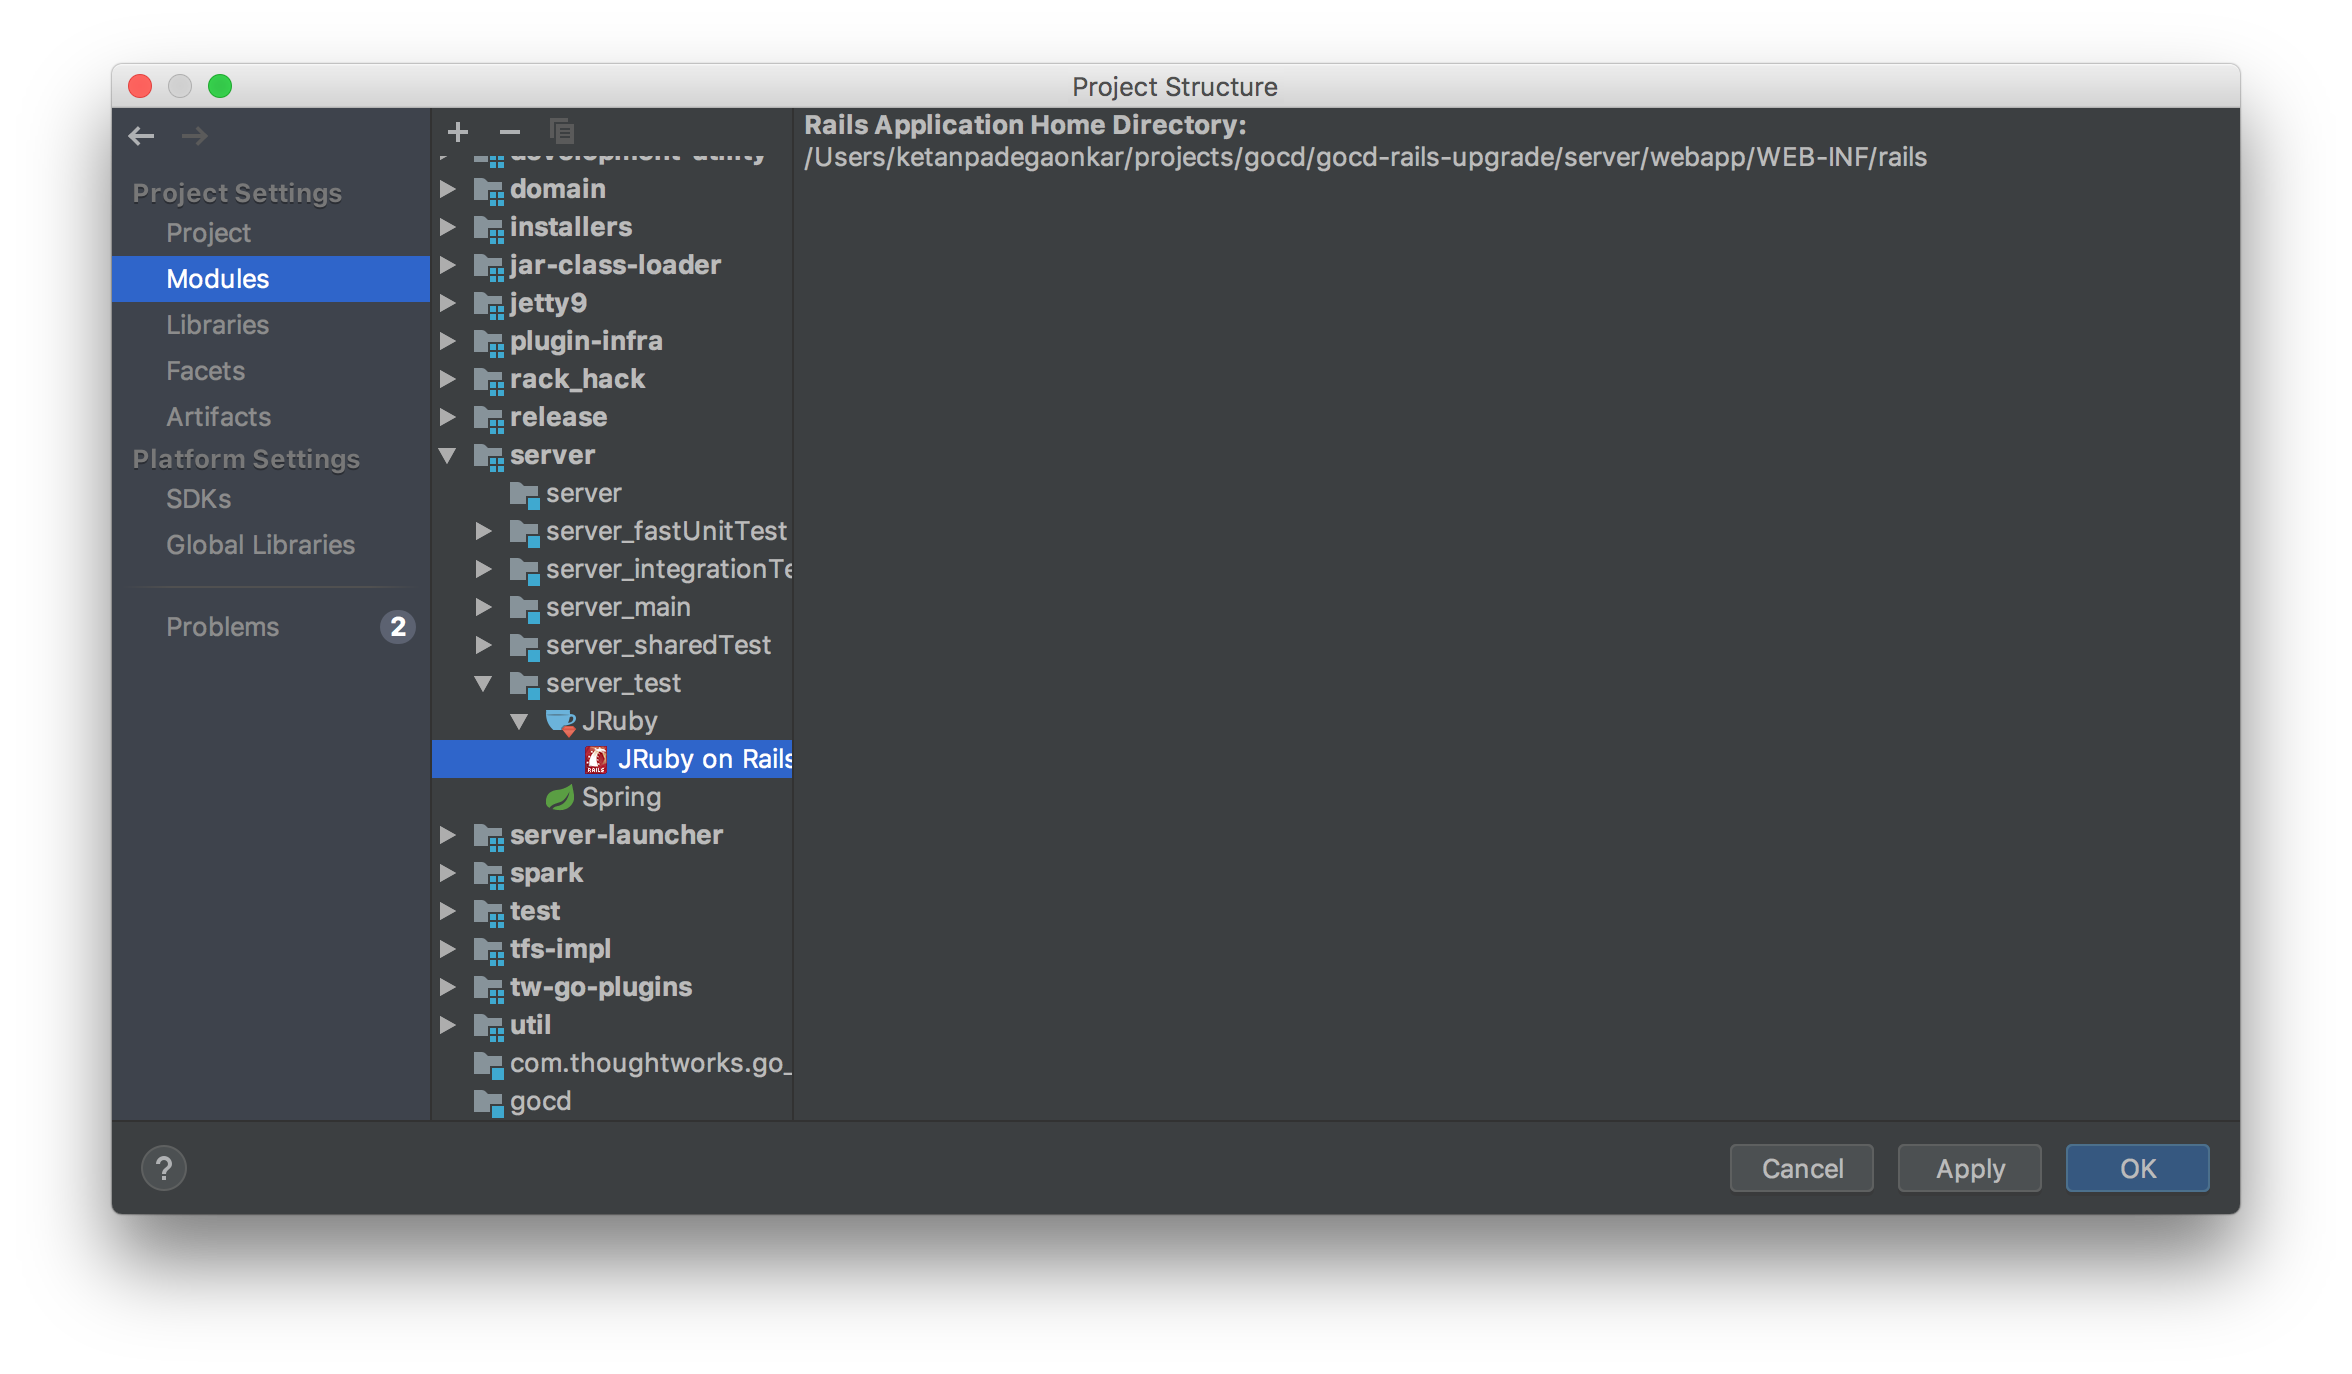
Ensure that your project module "server>server_test" is setup properly.
- Click "File menu > Project Structure"
- Select "Modules" in the "Project Structure" dialog
Navigate to "server>server_test" and right-click to add "JRuby" (select the right jruby version). Then right click to add "JRuby on Rails"

Configure the default RSpec run configuration
- Open
Run -> Edit configurations... - Click
Edit configuration templates...and find theRSpecdefault configuration - Check the
Use custom RSpec runner scriptcheckbox - Select
rspecfrom<project-directory>/server/scripts/jruby/rspec - Set the working directory to
<project-directory>/server/src/main/webapp/WEB-INF/rails - Set the
Ruby SDKoption toUse other SDK and 'rspec' gemwith the dropdown set to the correct version of JRuby that you configured above, e.gjruby-9.3.7.0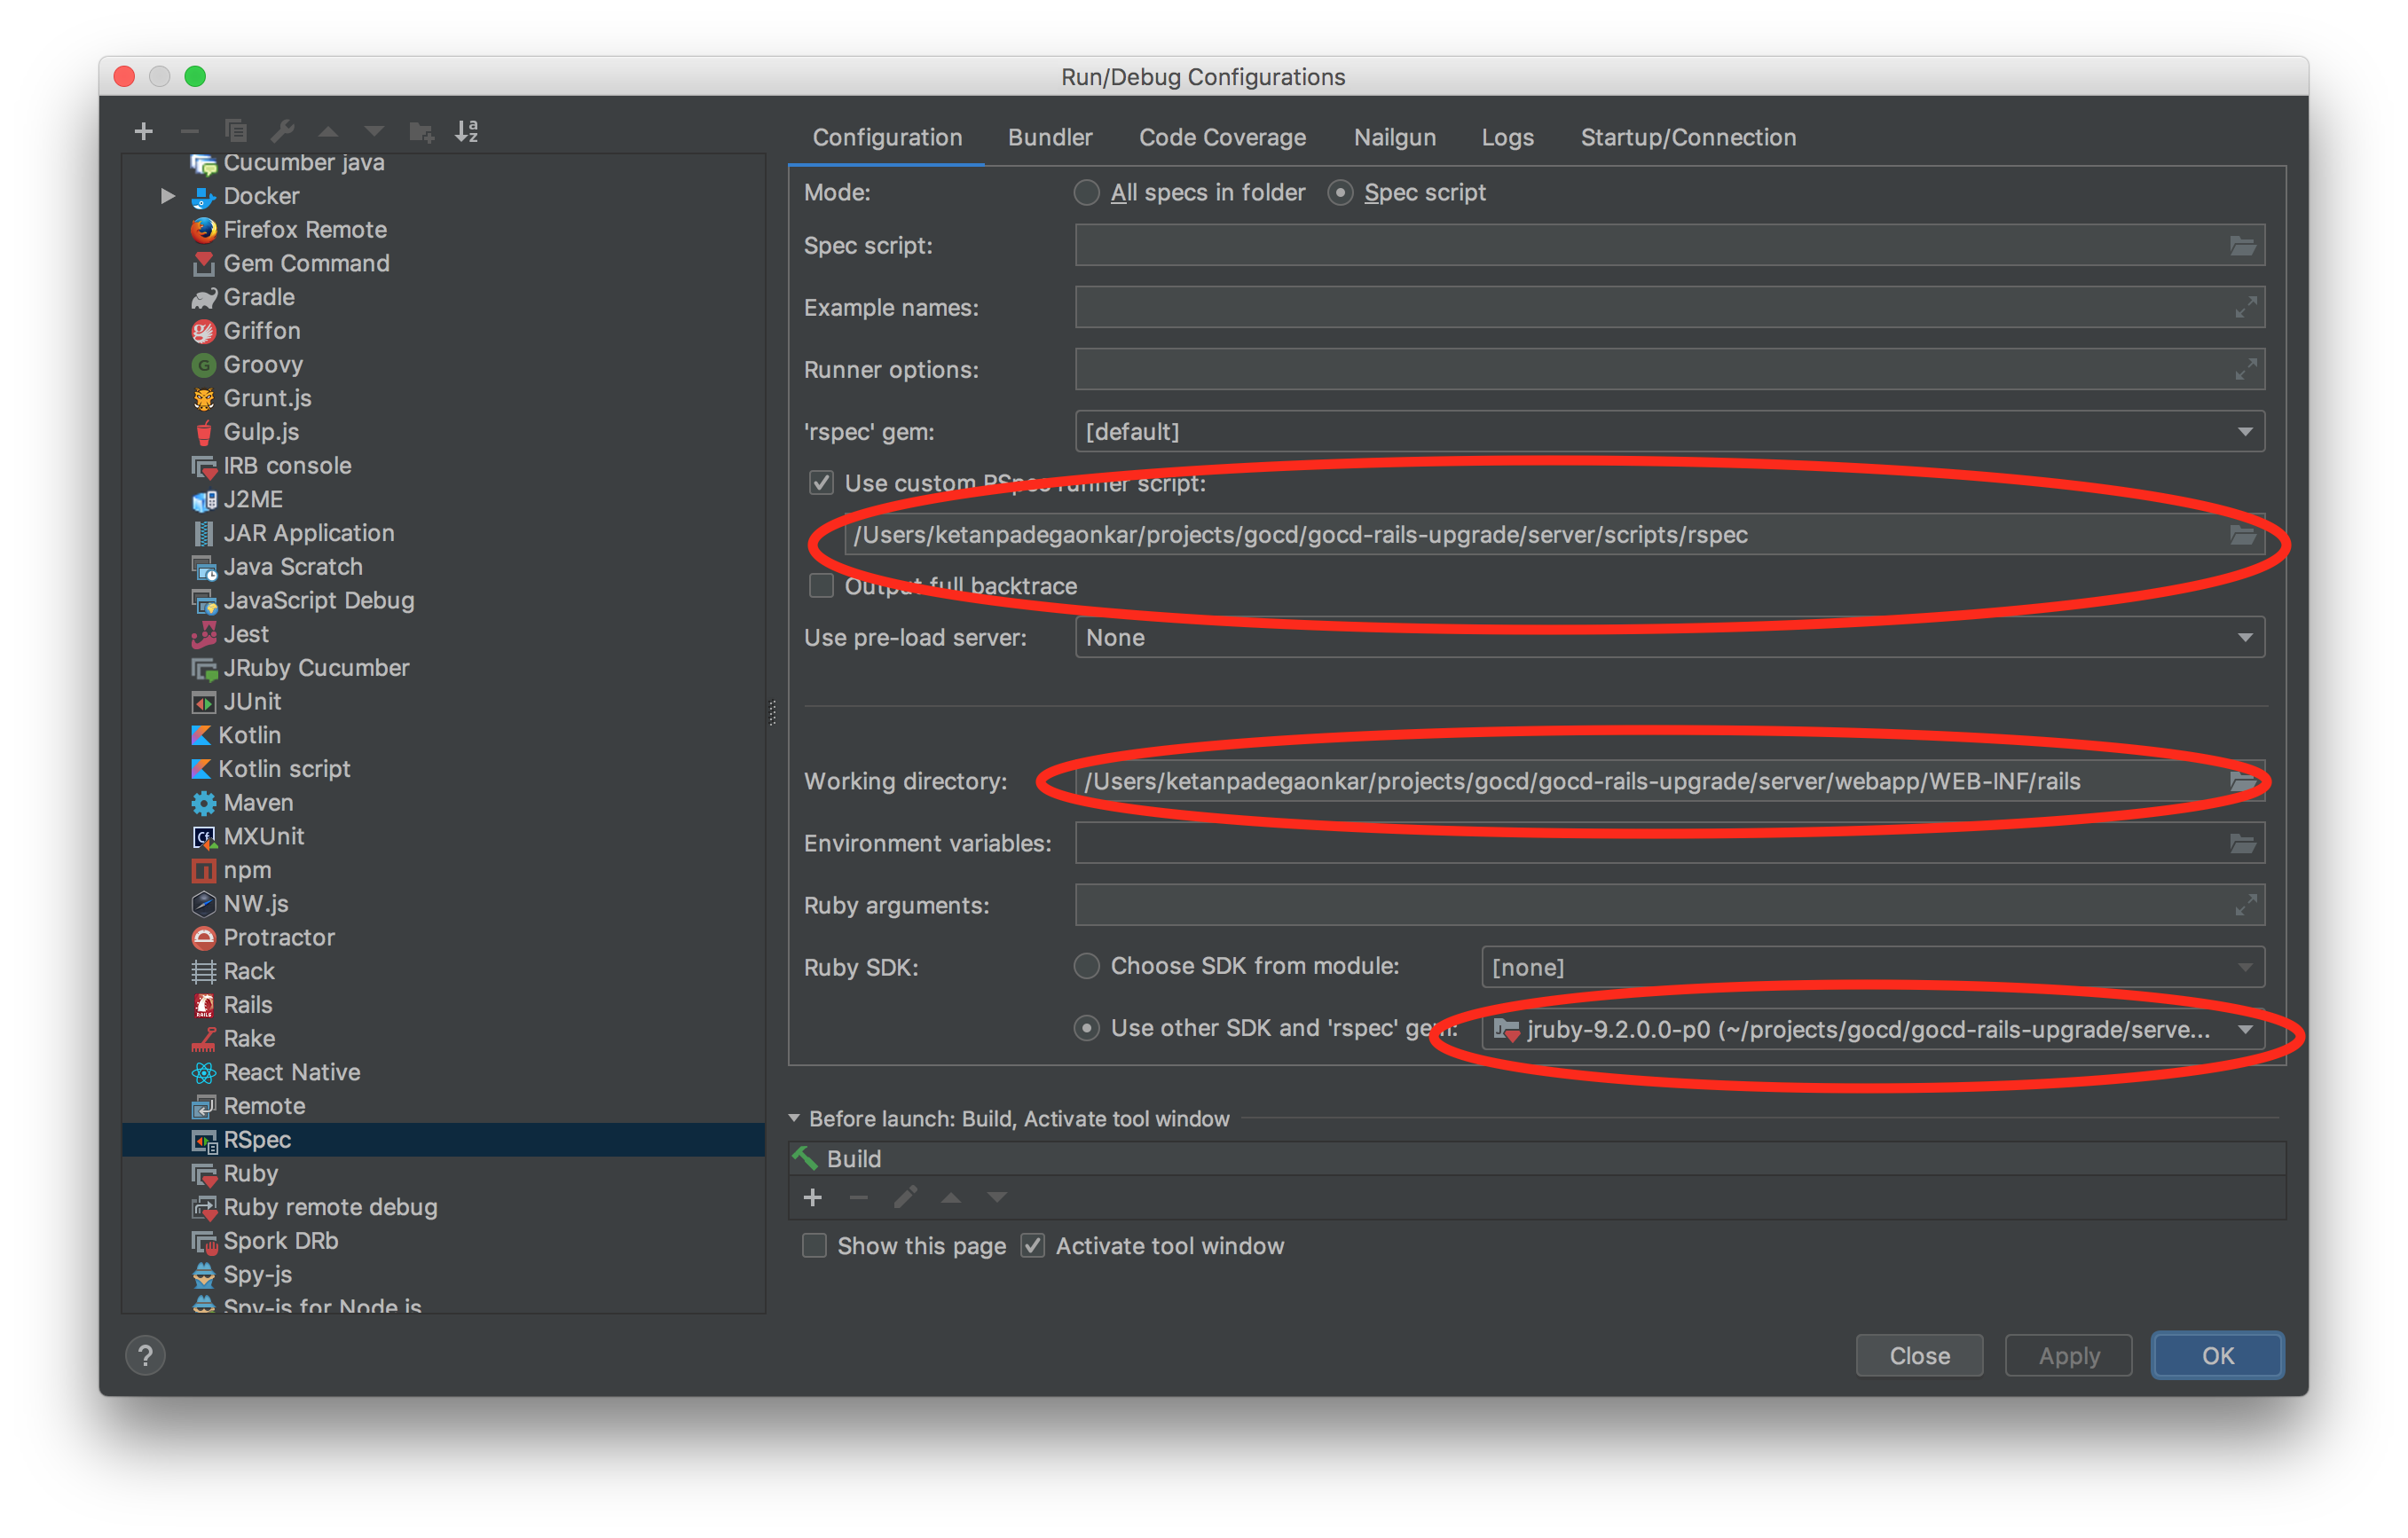
- Click
Applyto save - Open a spec file and run it
Run -> Run 'somefile_spec.rb', orCtrl+Shift+F10
- Open
3.4: Working on TypeScript/Webpack single page apps
If you're working on some of the newer pages in GoCD (almost everything exception stage/job details pages), this will watch your filesystem for any JS changes you make and keep compiling the JS in the background. This usually takes a couple of seconds to compile, after you hit save.
# forking in a subshell won't change the directory after interrupting/exiting
$ (cd server/src/main/webapp/WEB-INF/rails && yarn run webpack-watch)
3.5: Running Javascript tests
To run javascript tests —
In development environment (very quick)
Visit the following URLs:
- http://localhost:8153/go/assets/webpack/_specRunner.html (Most pages use MithrilJS 1.0). Ensure that you are running the webpack watcher to have changes reflected.
In order to run old/"legacy" raw javascript specs through browser, run following command to start server -
$ ./gradlew jasmineOldServer
Open a browser and navigate to http://localhost:8888/
In CI environment (very slow for running tests after every change)
$ ./gradlew jasmine
Step 5: Building docker images
5.1: Additional pre-requisites for Docker builds
- Docker container runtime (recommend at least 6GB memory if on Windows/MacOS)
dockerCLI- Docker buildx installed
You should be able to use whatever Docker container runtime distribution you like (colima, Rancher Desktop, Docker Desktop), but podman/containerd are not supported - a Docker daemon is necessary.
5.2: Running builds
Build the GoCD server (and keep images around for testing with docker run if you want)
./gradlew docker:gocd-server:assemble -PdockerBuildLocalZip -PdockerBuildKeepImages
Build a single docker gocd agent image
./gradlew docker:gocd-agent:wolfi-latest:assemble -PdockerBuildLocalZip -PdockerBuildKeepImages
Build all official agent image variants
./gradlew docker:gocd-agent:assemble -PdockerBuildLocalZip -PdockerBuildKeepImages
Troubleshooting / Common FAQ
Development Server problems
Generally, when investigating issues you should
- look at the console stdout/stderr logs in your IDE. Some basic errors go here
- look at
server/logs/go-server.log- this is where most detail will go for the running server - if the server starts, but is not behaving how you expect, sometimes the support api can be useful to see the environment and system properties being used
curl http://admin:badger@localhost:8153/go/api/support(with the default dev username/pass)
General problems with weird errors
When in doubt, try another ./gradlew prepare. If things seem really messed up, try a ./gradlew clean prepare (slower, and will delete any local DB you have).
Exception in thread "main" java.io.FileNotFoundException: Source 'src/main/webapp/WEB-INF/rails/webpack/rails-shared/plugin-endpoint.js' does not exist
This probably means the working directory of your server (DevelopmentServer run configuration) is not correct. If you
have specified a relative folder, try specifying an absolute path.
You can check the user.dir system property via the /go/api/support response if you want to understand what working directory your
server is seeing at startup.
Blank login page with server log showing Caused by: java.lang.RuntimeException: Could not load compiled manifest from 'webpack/manifest.json'
Try ./gradlew prepare again. An alternative which might not require restarting your server is putting webpack into watch mode per Working on TypeScript/Webpack single page apps above.
Explanation: You, or Gradle might have cleaned or removed webpack assets since you last started your server.
Blank login page with server log showing org.jruby.rack.RackInitializationException: Could not find sass-embedded-x.xx.x in any of the sources
Ensure that are using the same major Java version (e.g 21, 25 etc) with ./gradlew prepare as you are using to launch the DevelopmentServer within your IDE.
- If you run Gradle from within the IDE, check the Gradle SDK settings as noted above.
- If you run Gradle from a shell/command line, check the
java -versionbeing used to launch Gradle.
Explanation: The reason this happens specifically for sass-embedded, is that this gem installs a Ruby 'extension' (which is actually a downloaded native binary for sass) into a platform folder such as universal-java-11, universal-java-17 etc. At runtime this cannot be located if the versions are different. This only affects development mode, where assets are compiled dynamically.
Development Agent problems
Agent won't connect to server
Try rm agent/config/token and restart the agent.
Explanation: If you did ./gradlew clean at some point on your server, or changed the cruise-config.xml your server's identity may have changed and the agent's token is no longer trusted.